 This is the first year I am starting seeds indoors for my vegetable and herb garden. In the past, I have been willing to take my chances shoving seeds directly in the ground when the weather was warm enough. After my experience last year with my urban chickens digging up and eating so many of my seeds, I thought transplanting small plants might improve the survival rate of my veggies. I am also planning on managing where the girls are allowed to free-range a little better this year as well, to protect the area of new plantings.
I went to Portland Nursery to “price out” grow lights and ended up just buying one 4-foot light there on the spot instead. I picked up the little trays and domes as well, but I hated to spend even more money on the pots. The folks over at You Grow Girl had posted some cool gift ideas for gardeners this past holiday season, which included a wooden mold to form pots for your starter seeds from newspaper. I love the idea of recycling materials into something useful, and biodegradable, in the garden. Curious, I started combing the web to see how much info was out there on making newspaper pots.
Photo by Isaac Viel
It didn’t take long to find several methods, ranging from semi-complex origami to the fairly simple pop-can methods. It will probably take you 3-4 pots to get your groove, but, once found, it is smooth sailing. We had a mini “Super Tuesday” get-together the other evening, listening to NPR coverage and drinking red wine, and I blew through about 60 of these – no kidding!
Step 1: Take one entire sheet of newspaper and fold vertically. Cut along the horizontal crease so you have two pieces – one piece makes one pot.
Step 2: Fold the newspaper half over once, to make it just a little thicker.
Step 3: Make about a 1″ horizontal fold to act as the “lip”.
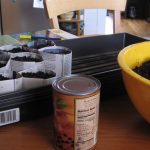
Step 4: Roll the strip of newspaper around a can, leaving about 2″ over hanging from the bottom of the can.
Step 5: Fold the overhanging 2″ around the base of the can. This forms the bottom of the pot.
Step 6: Gently slide off the tin can. Press with one finger on the bottom of the pot, to secure in place, while using your other hand to fold over the “lip”. This secures the pot, so it doesn’t unravel.
Step 7: Pour in soil.
 (Click series of three pictures for larger image and text explanation)
This is what worked for me, and your method will probably differ a little. It went so quick though and saved me tons of money. Now when my next round of seed planting rolls around, I don’t need to wait to make a plant-store-run for new pots. I can just grab old copies of our Sunday New York Times and get rollin’!


Thanks for sharing such an easy method. I had a moment of weakness and bought 3 sets of the peat pots- and now will make these for the many more I would have needed. Now i only need more of the big flats to hold them in…
I always wondered – how sturdy are these when you water them?
So far so good, on the sturdiness. But them I am just spritzing the plants, not drenching with water.
When I plant them outside, I will just bring out the whole seed tray and delicately handle the pots.
-Renee
What a great idea! I just rolled out a bunch of pots. Wish I had looked at your link site thought. I had no idea what a “pop” can was and used my dog’s dog food can. I can highly recommend not using those in the future as the lip slices your knuckles just like papercuts. Sheesh… but I love the finished product and can’t wait to plant my corn seeds in them.
okay, this is probably a REALLY stupid question…but i have to ask: do you plant the newspaper directly into the dirt? i live in new mexico (and newspaper would probably only help my soil) so i’m wondering if the paper would ever disintegrate. thanks!
That is not a stupid question! Yes, I plant them directly in the soil. Newspaper breaks down fairly quickly. I do peel back the bottoms of the pots gently when I set them in the soil, so the newspaper is really still mostly on the sides – just to make it easier for the roots to dig down.
hi muddy-
i planted my seedlings! i did take them out of their newspaper wrappings, but between the roots and the hard-ish soil they kept their form just fine. i think they’re going to make it, however we’re getting guineas at the end of the month–i wonder if they have a taste for seedling…? thanks again for your great idea.
missy
Thanks for posting this cool method.
As for transplants, there is no better way to grow healthier plants with better survival and bigger rewards. Plus, it is easier to plan out your garden space and you get a jump on spring!
paper towel or toilet paper rolls cut to size with one end folded under work well